
How to Attach Charms to Your SlippersBut if you’ve never attached slipper charms before, the process might seem a bit daunting. Fear not! This step-by-step guide will walk you through everything you need to know about attaching charms to your slippers, ensuring a secure fit and a stylish finish.
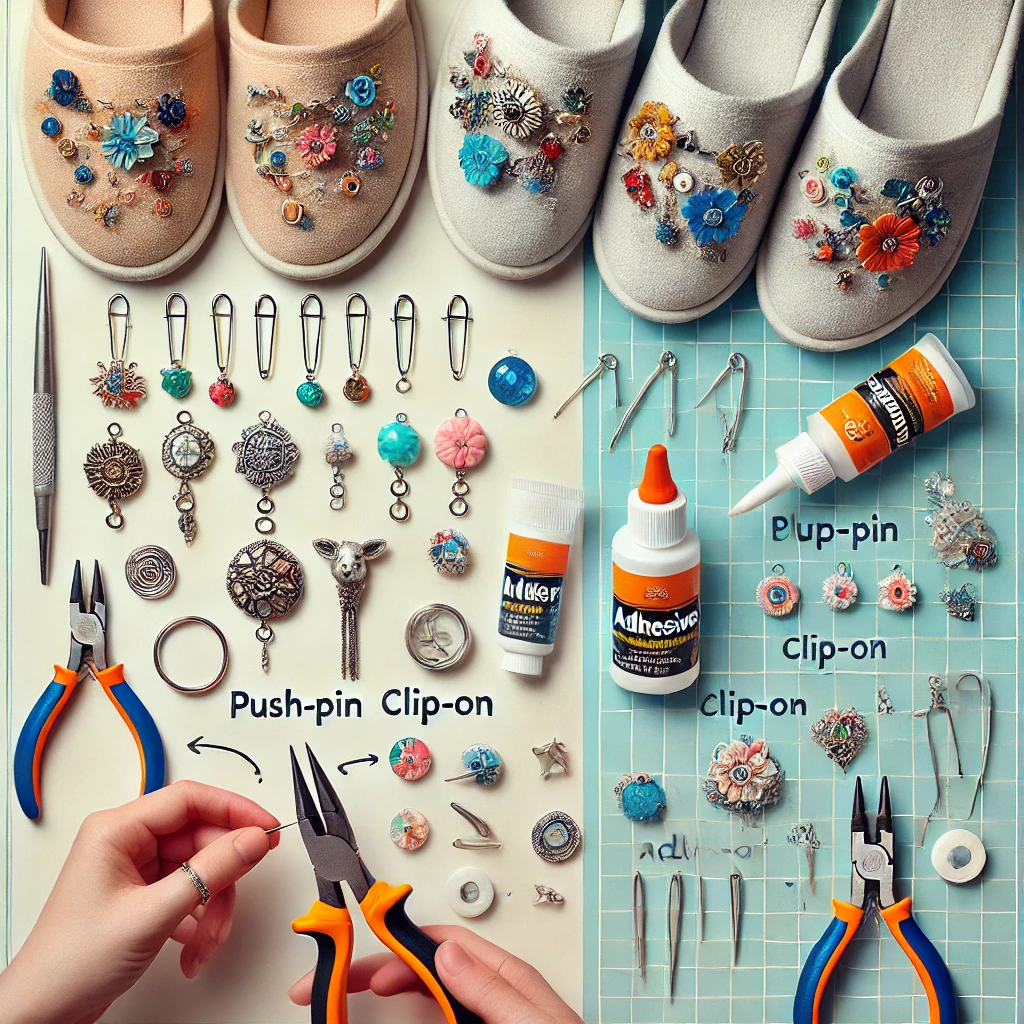
1. Gather Your Supplies
Before you begin, ensure you have all the necessary items:
- Slippers: Choose slippers with holes, straps, or areas suitable for attaching charms. Crocs-style slippers are ideal, but many other designs work well too.
- Charms: Select charms that reflect your personality or the theme you’re going for.
- Attachment Tools (if needed): Depending on the charm type, you might need a small hook, pliers, or adhesive.
- Optional Accessories: Consider adding extra elements like ribbons or beads for a more customized look.
Tip: Ensure the charms are lightweight to avoid discomfort while wearing your slippers.
2. Understand Your Slipper Type
Not all slippers are created equal, so it’s essential to understand the design of your slippers and how they’ll interact with the charms:
- Hole-Based Designs: Ideal for push-pin charms that snap into place.
- Strap-Based Designs: Best suited for clip-on or slide-on charms.
- Flat Surfaces: These may require adhesive or sewn-on charms.
Example: If your slippers have straps, opt for clip-on charms that grip firmly.
3. Choose the Right Type of Charms
Charms come in various styles, each with its own attachment method. Here’s a quick overview:
- Push-Pin Charms: These have a small pin that fits snugly into holes in the slipper.
- Clip-On Charms: Designed to grip onto straps or edges.
- Slide-On Charms: These slide over straps and stay in place.
- Adhesive Charms: Stick directly onto flat surfaces with a strong adhesive.
- Sew-On Charms: Use a needle and thread to secure these to fabric slippers.
Tip: Push-pin and clip-on charms are the easiest to use for beginners.
4. Clean and Prepare Your Slippers
Before attaching any charms, clean your slippers to ensure a smooth and secure application:
- Wash: Use a damp cloth to wipe down the surface of your slippers.
- Dry: Make sure they are completely dry before proceeding.
- Inspect: Check for any damage that might interfere with the attachment process.
Tip: For adhesive charms, clean the surface with rubbing alcohol to improve adhesion.
5. Attach Push-Pin Charms
If you’re using push-pin charms, follow these steps:
- Position the Charm: Decide where you want the charm to go.
- Align the Pin: Place the pin into one of the holes on the slipper.
- Push Firmly: Press the charm into the hole until it snaps into place.
- Test for Security: Tug gently to ensure the charm is secure.
Example: Push-pin charms are perfect for Crocs-style slippers and can be repositioned easily.
6. Attach Clip-On Charms
For clip-on charms, follow these steps:
- Open the Clip: Gently open the clip mechanism.
- Position on the Strap: Align the clip with the slipper strap or edge.
- Secure in Place: Press the clip shut until it grips firmly.
- Adjust as Needed: Slide the charm along the strap to find the perfect placement.
Tip: Clip-on charms work well for slippers with wide straps or open edges.
7. Attach Slide-On Charms
Slide-on charms are simple to attach:
- Thread the Charm: Slide the charm over the slipper strap.
- Position It: Move the charm to the desired location.
- Secure It: Ensure the charm fits snugly and doesn’t move excessively.
Example: Use slide-on charms to create a layered look with multiple charms on one strap.
8. Attach Adhesive Charms
If your slippers have flat surfaces, adhesive charms are a great option:
- Apply Adhesive: Add a small amount of strong glue to the back of the charm.
- Position the Charm: Place the charm onto the slipper surface.
- Press Firmly: Hold the charm in place for 10-15 seconds.
- Let It Set: Allow the adhesive to cure according to the glue’s instructions.
Tip: Use a waterproof adhesive for long-lasting results.
9. Attach Sew-On Charms
For fabric slippers, sew-on charms offer a durable and decorative option:
- Thread Your Needle: Use a strong, matching thread.
- Position the Charm: Place the charm where you want it.
- Stitch Around the Edges: Secure the charm with small, even stitches.
- Knot and Trim: Tie a secure knot and trim the excess thread.
Example: Sew-on charms are ideal for cozy fabric slippers, adding a unique handcrafted touch.
10. Check for Comfort and Security
After attaching your charms, take a moment to ensure they are comfortable and secure:
- Comfort Test: Walk around to make sure the charms don’t cause discomfort.
- Durability Test: Tug gently on the charms to ensure they won’t fall off.
Tip: If a charm feels loose, reinforce it using adhesive or adjust its position.
11. Creative Ideas for Styling Slipper Charms
Once you’ve mastered the attachment process, it’s time to get creative:
- Themes: Create themed slippers for holidays, seasons, or special occasions.
- Mix and Match: Combine different charm types for a unique look.
- Layering: Add multiple charms to one slipper for a bold statement.
- Personalization: Use letter charms to spell out your name or favorite words.
Example: For a beach-themed look, combine seashell, starfish, and anchor charms.
12. Maintenance and Care
To keep your charms looking their best:
- Clean Regularly: Wipe down your charms with a damp cloth to remove dirt.
- Check for Loose Attachments: Periodically check and tighten any loose charms.
- Store Safely: When not in use, store your charms in a small box to prevent damage.
Tip: Avoid exposing your charms to harsh chemicals or extreme heat.